Publish your app in the App Store
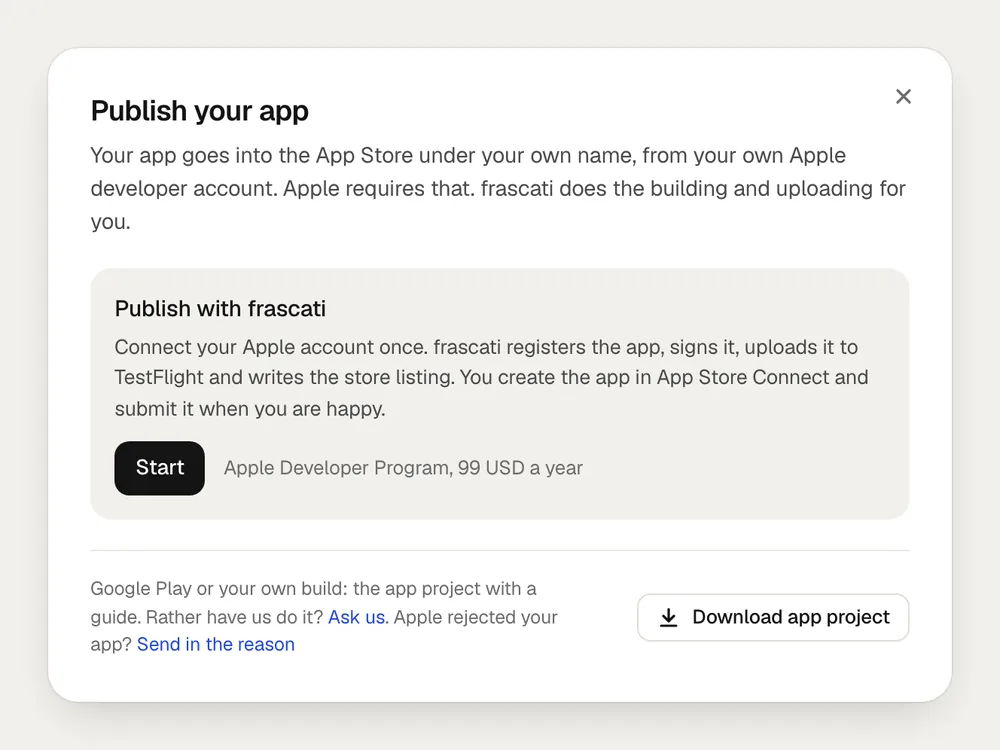
Your app goes into the App Store under your own name, from your own Apple developer account. frascati registers the app, signs it, uploads it to TestFlight and writes the store listing. Apple keeps two steps for you: creating the app in App Store Connect and answering App Privacy. The app goes to Apple only when you click Submit.
How it works
Open your app in the editor and click Publish at the top right. The window shows where your app stands and leads you through seven steps:
Before you start: the Apple Developer Program and your Apple account
Your app: name, bundle ID and version
Create the app in App Store Connect
Build and upload, to TestFlight
Store listing, with the screenshots
App Privacy
Check and submit
You can close the window at any time. When you open it again, Continue takes you to the first step that is not done yet.
What you need
- A membership in the Apple Developer Program, 99 USD a year, paid to Apple: join the Apple Developer Program. To enrol as a company, Apple asks for its D-U-N-S number.
- The latest agreements, accepted in App Store Connect by the Account Holder, the person who enrolled: open Agreements.
- A paid Pro or Business plan. Building starts with your first payment, so not during the trial. See the plans.
- An iPhone to test the app on, with the free TestFlight app.
Plan for about an hour of your own time. The build takes 15 to 30 minutes, and Apple reviews most apps within two days.
Step 1: Connect your Apple account
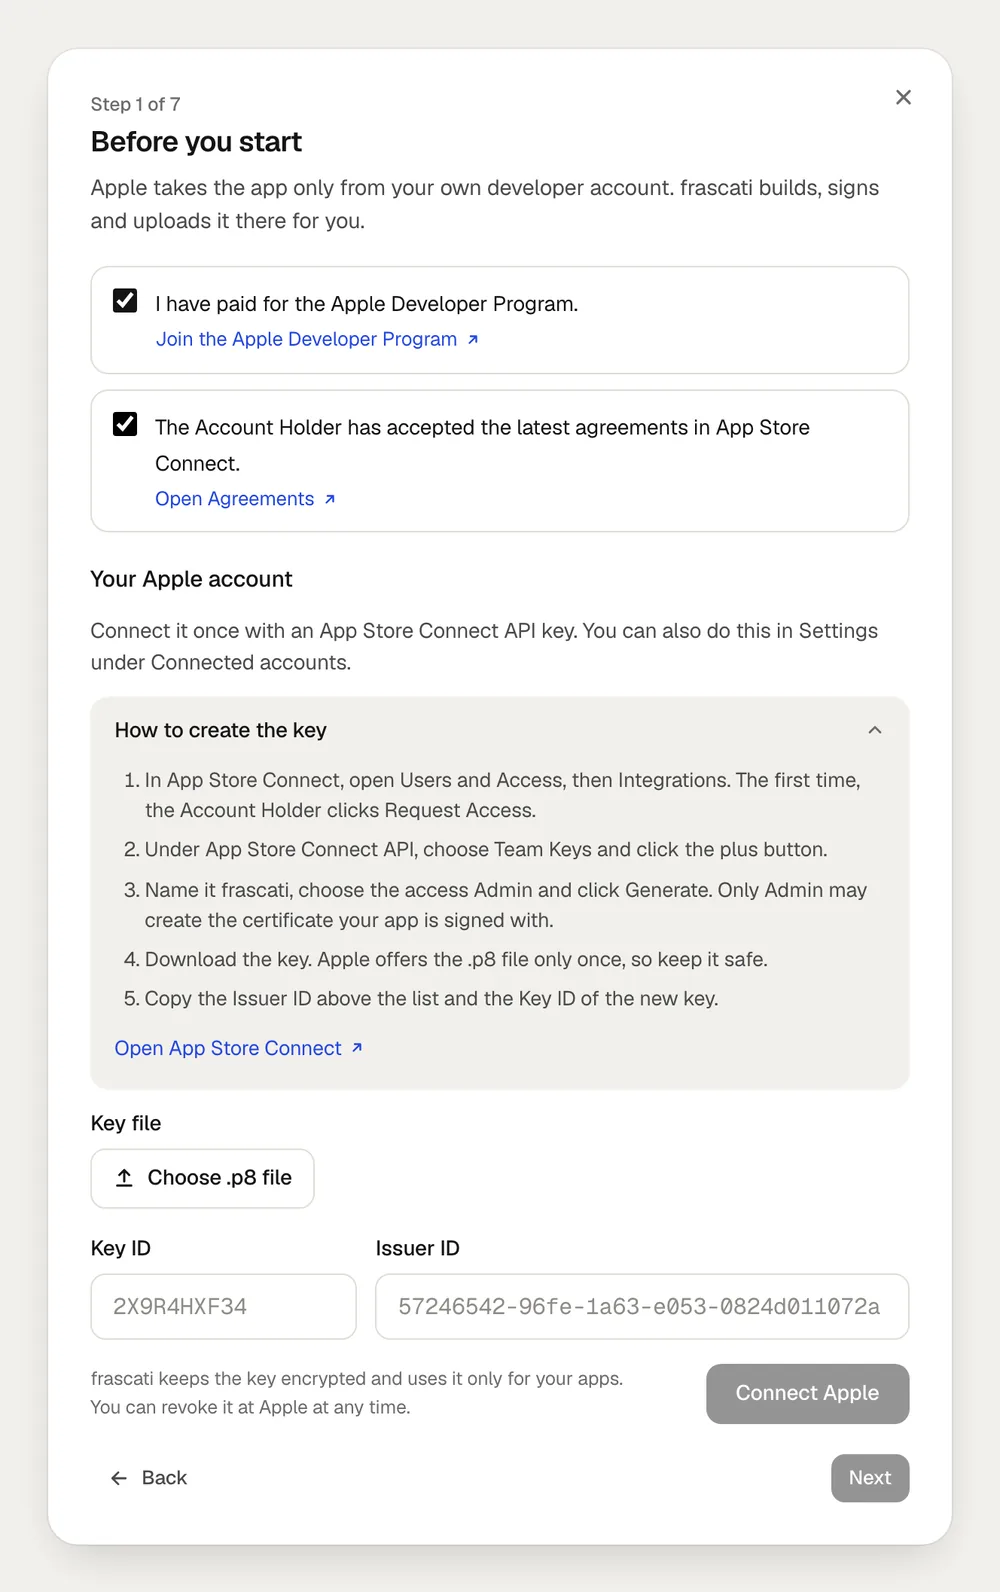
In Before you start, tick the two requirements and connect your Apple account, once, with an App Store Connect API key. frascati uses this key for everything at Apple. You can also connect it in Settings under Connected accounts.
Create the key at Apple
In App Store Connect, open Users and Access, then Integrations. The first time, the Account Holder clicks Request Access.
Under App Store Connect API, choose Team Keys and click the plus button.
Name it frascati, choose the access Admin and click Generate. It has to be Admin: only Admin may create the certificate your app is signed with.
Download the key. Apple offers the .p8 file only once, so keep it safe.
Copy the Issuer ID above the list and the Key ID of the new key.
Connect it in frascati
Click Choose .p8 file and pick the downloaded key. The Key ID fills in from the file's name. Paste the Issuer ID and click Connect Apple. frascati checks the key with Apple and then shows your team and how many apps it has.
Step 2: Your app
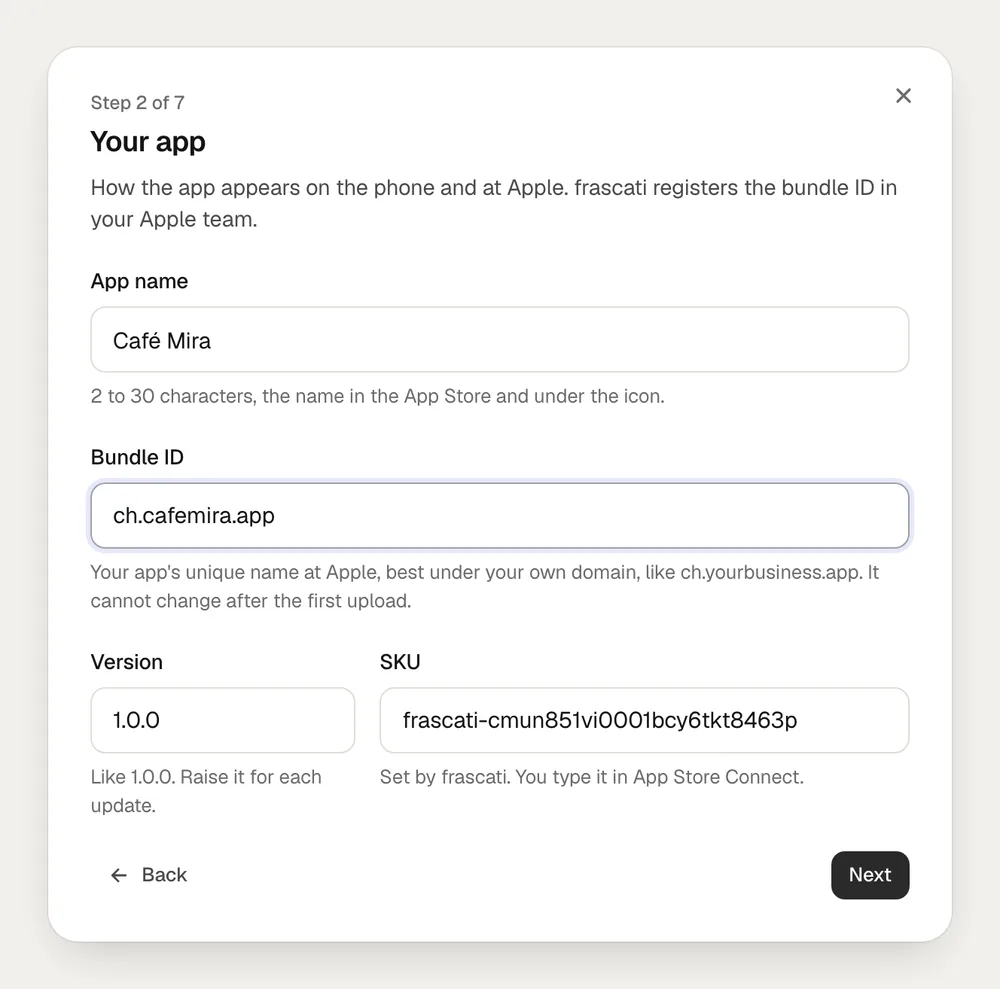
How the app appears on the phone and at Apple. frascati fills in values from your app; change them if you like, then click Next. frascati registers the bundle ID in your Apple team.
- App name
- 2 to 30 characters: the name in the App Store and under the icon.
- Bundle ID
- Your app's unique name at Apple, best under your own domain, like ch.yourbusiness.app. Apple gives out each one only once, and it cannot change after the first upload.
- Version
- Like 1.0.0. Raise it for every update.
- SKU
- Set by frascati. You type it into App Store Connect in the next step; nobody else sees it.
Step 3: Create the app in App Store Connect
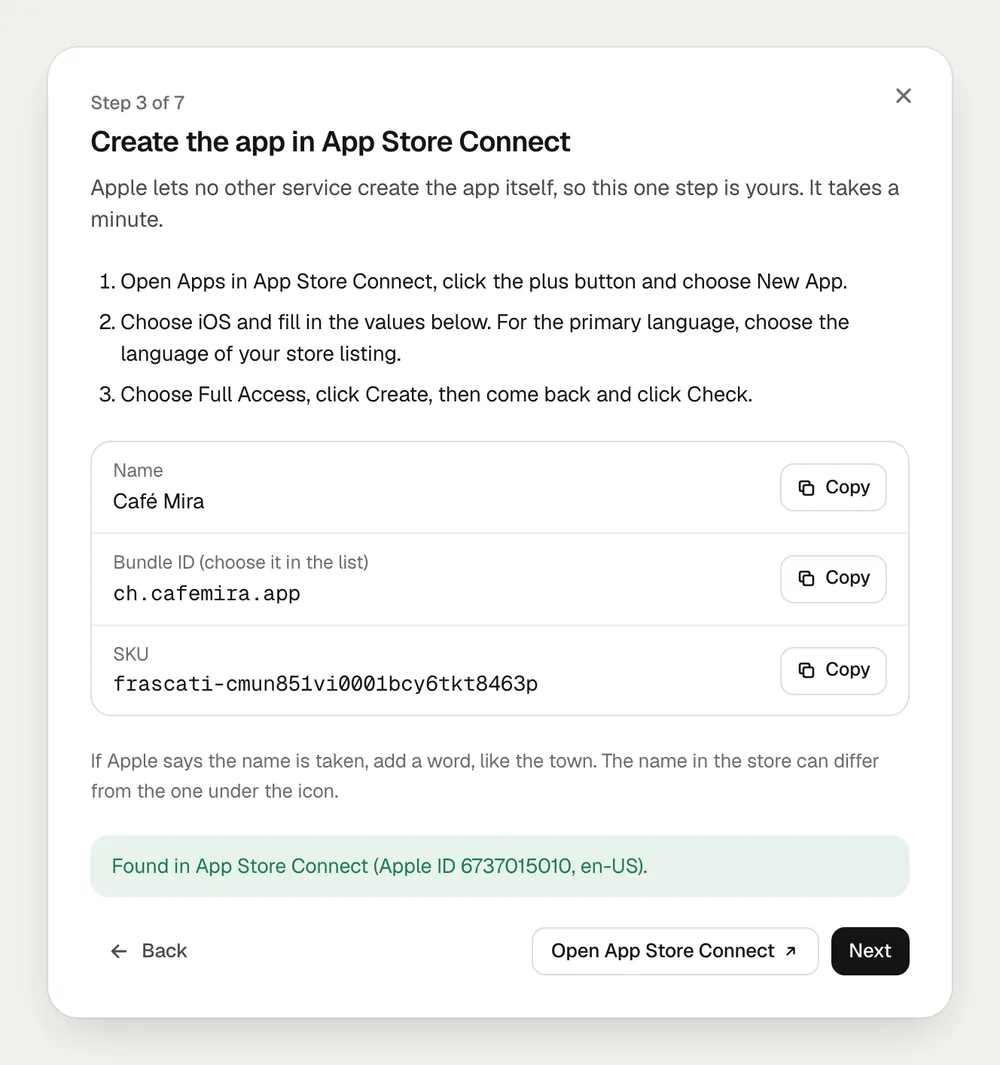
Apple lets no other service create the app itself, so this one step is yours. It takes a minute. frascati shows the three values you need, each with a Copy button: Name, Bundle ID and SKU.
Open Apps in App Store Connect, click the plus button and choose New App.
Choose iOS. Enter the name, choose the bundle ID in the list and enter the SKU, exactly as frascati shows them. For the primary language, choose the language of your store listing.
Choose Full Access and click Create.
Back in frascati, click Check. Once frascati finds the app, it shows its Apple ID, and Next takes you on.
Step 4: Build and upload
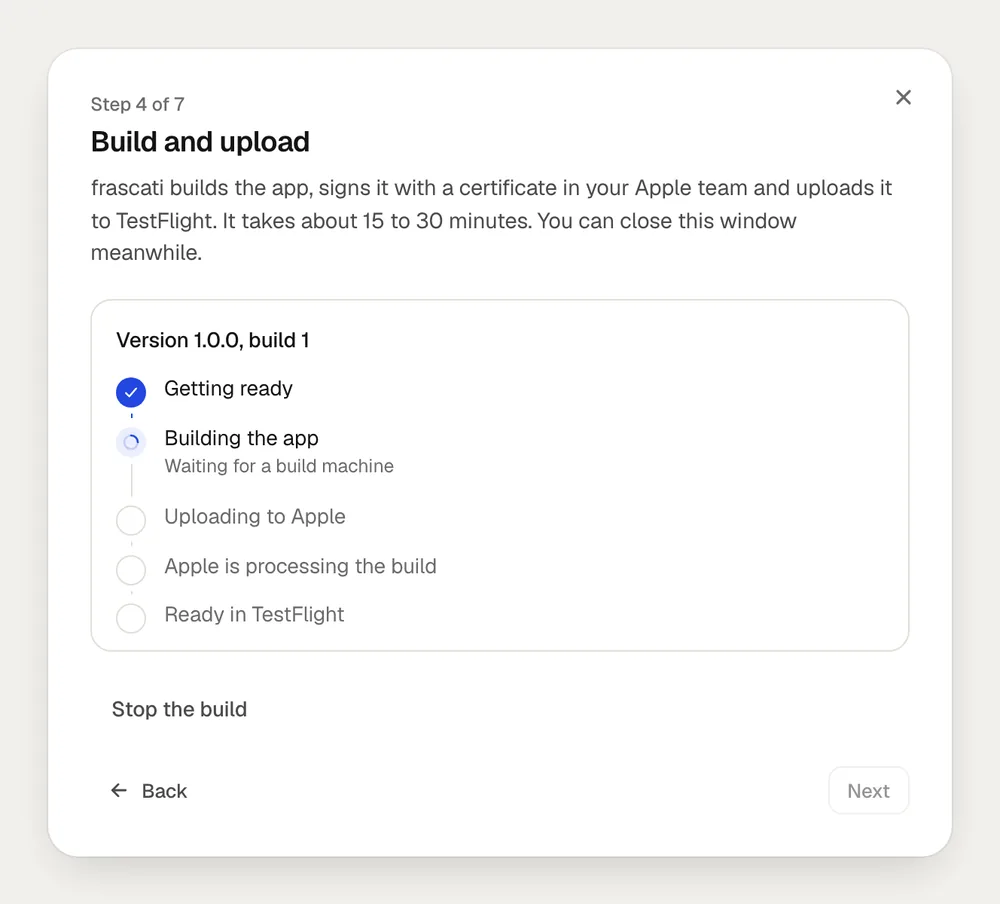
Click Build the app. frascati builds the app, signs it with a certificate in your Apple team and uploads it to TestFlight, Apple's place for testing. It takes about 15 to 30 minutes, and you can close the window meanwhile. The build goes through these stages:
Getting ready
Building the app
Uploading to Apple
Apple is processing the build
Ready in TestFlight
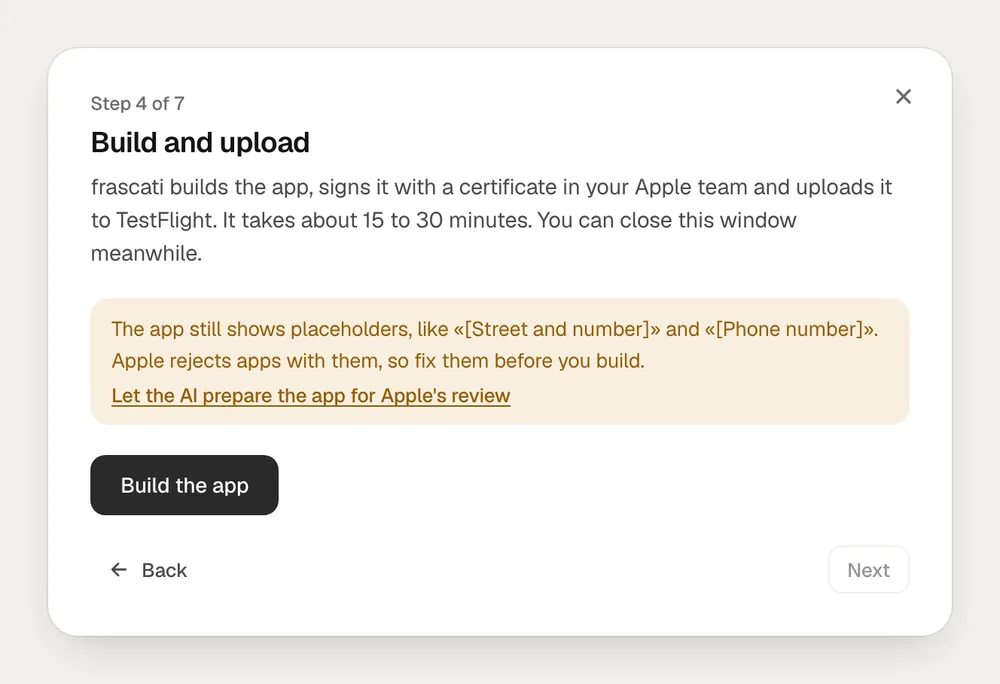
Apple rejects apps that still show placeholders, like [Address]. If yours has any, frascati says so before the build, and Let the AI prepare the app for Apple's review goes through every screen and fixes what Apple would reject.
If you change the app after a build, frascati tells you. Build again, so TestFlight and Apple get the app as it is now.
Test it with TestFlight
Try the build on your own iPhone before Apple sees it. When a build is ready, frascati adds the Account Holder and the Admins of your Apple team as testers, and Apple emails each of them an invitation to test the app in TestFlight. The publishing window names who was added.
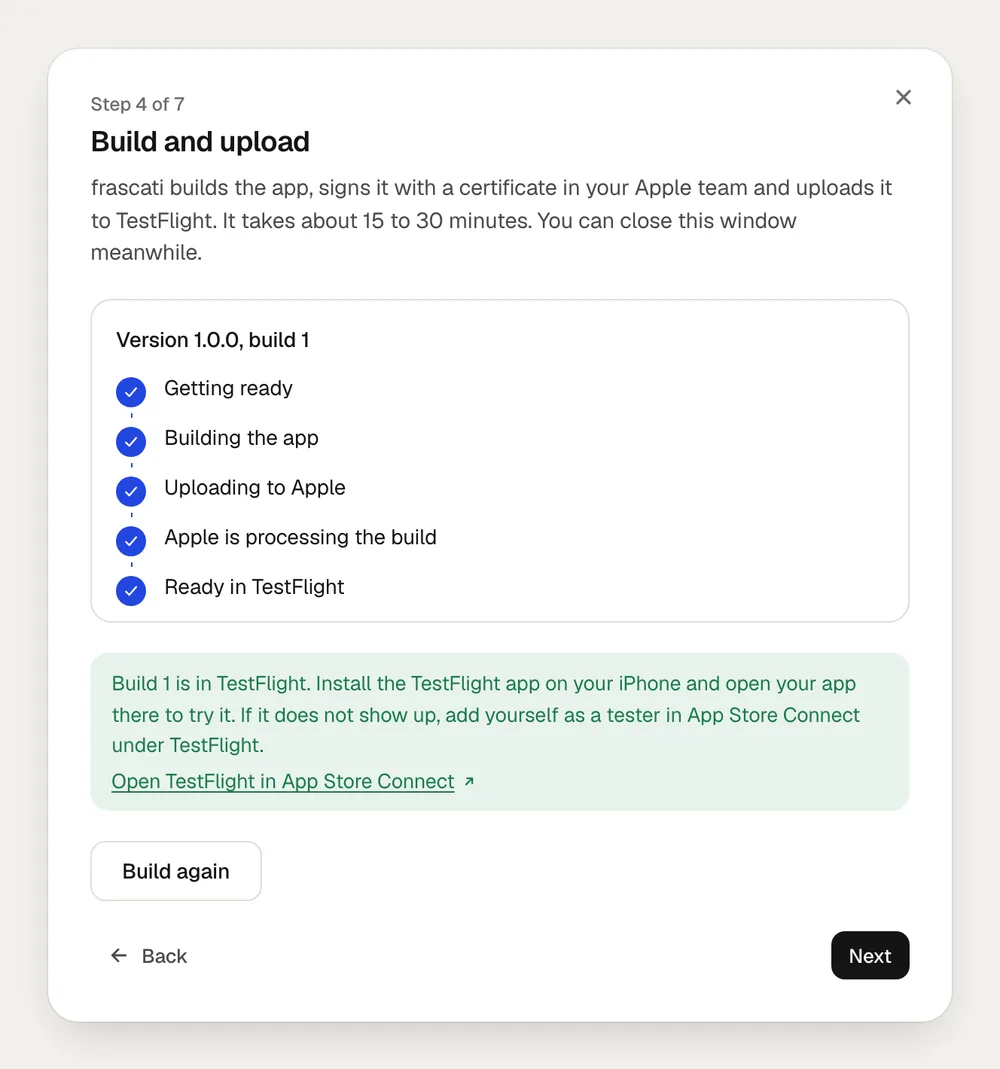
Install the free TestFlight app from the App Store on your iPhone.
Open Apple's invitation email on the iPhone and follow its link to TestFlight. Your app is then listed in TestFlight.
Tap Install, open the app and use it like a customer: open every screen, sign in, send a form.
Before you submit, frascati asks you to confirm that you tested this build. A new build asks again.
Step 5: Store listing
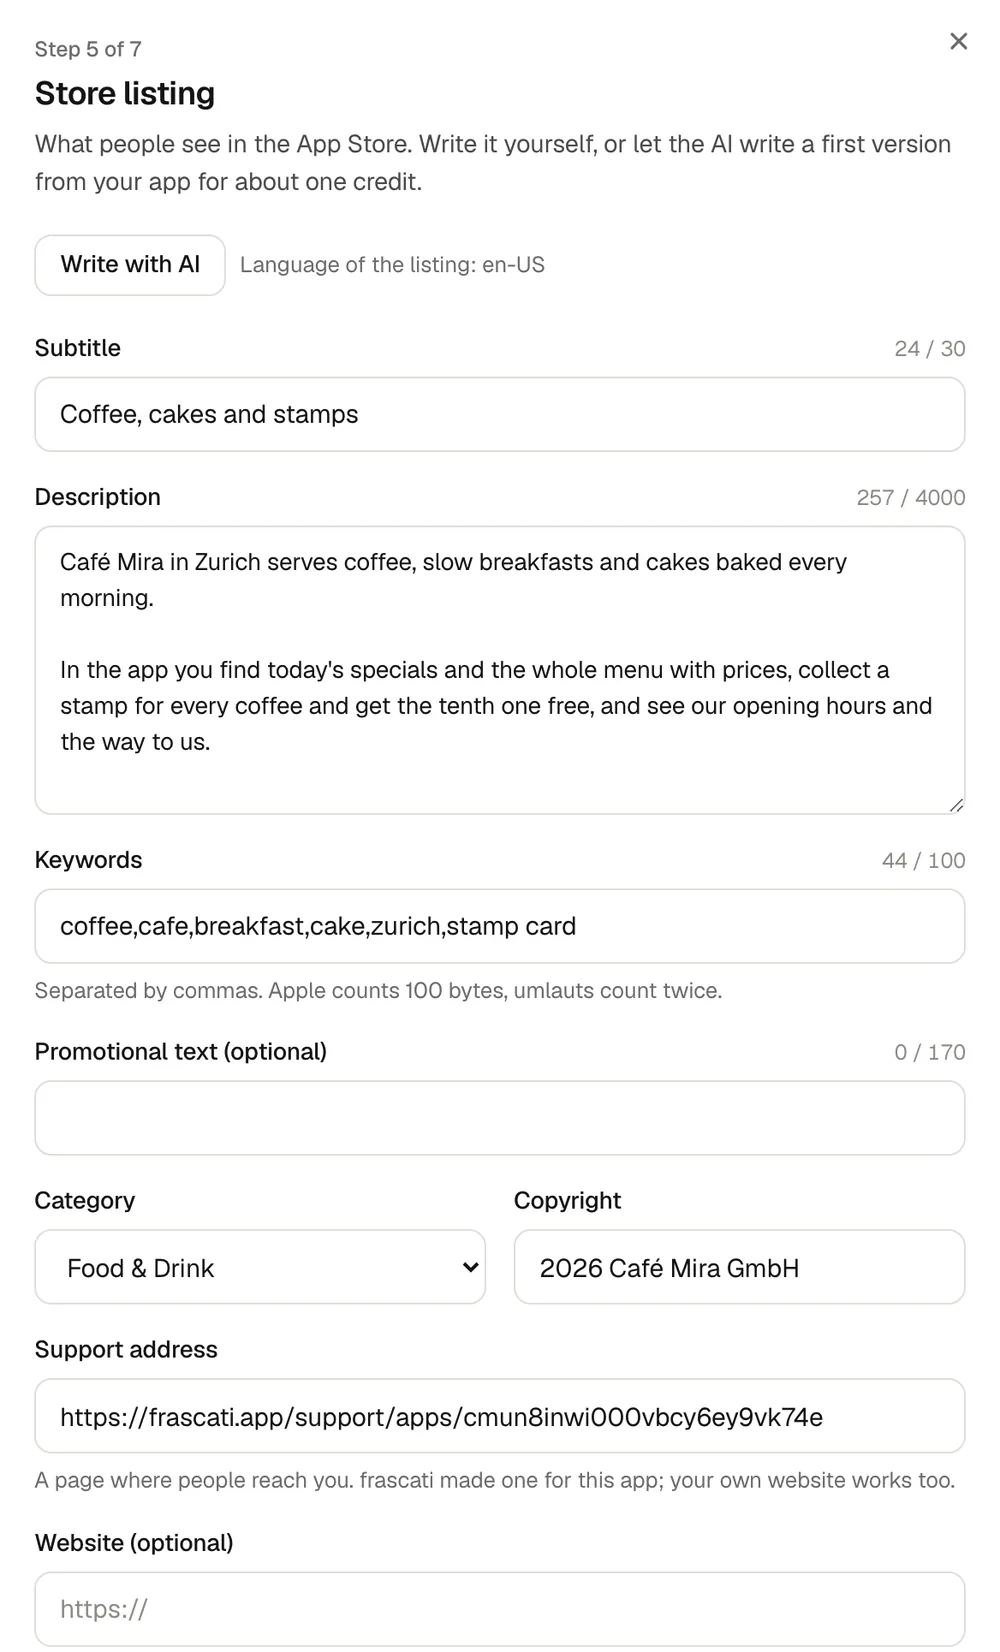
What people see in the App Store. Write it yourself, or click Write with AI: it writes a first version from your app, in the language of your listing, and is billed like a change in the chat. Read it and change what is not right.
- Subtitle
- Up to 30 characters: what the app is for.
- Description
- Up to 4,000 characters.
- Keywords
- Separated by commas, 100 bytes in all. Letters like ä, ö and é count twice.
- What's new
- Only for an update: a sentence about what changed.
- Promotional text
- Optional, up to 170 characters.
- Category and copyright
- The App Store category, and a line like 2026 Your Business Ltd.
- Support address
- A page where people reach you. frascati made one for your app; your own website works too.
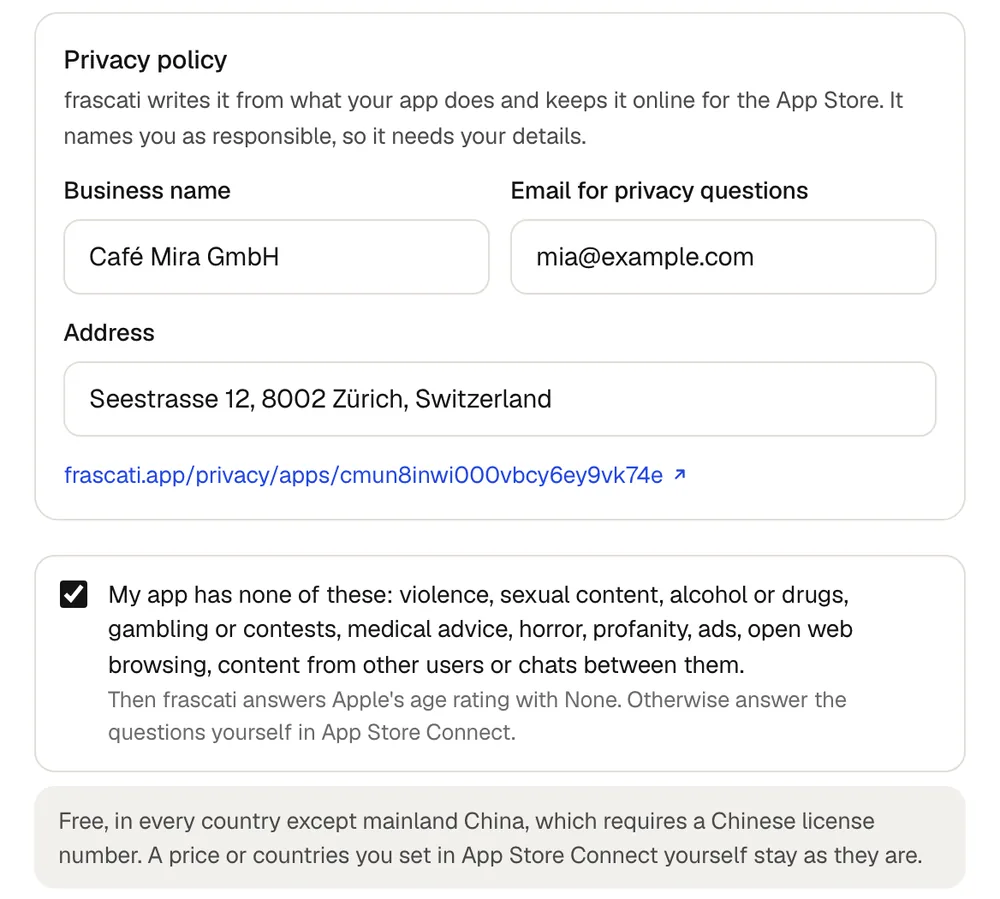
Privacy policy
The App Store requires one. frascati writes it from what your app does and keeps it online on frascati.app. It names you as responsible, so it needs your business name, address and an email for privacy questions.
Age rating, price and countries
If your app has none of the content listed there, such as violence, gambling, medical advice or content from other users, tick the box, and frascati answers Apple's age rating questions with None. Otherwise answer them yourself in App Store Connect.
The app is free, in every country except mainland China, which requires a Chinese license number. A price or countries you set in App Store Connect yourself stay as they are.
For Apple's review
Apple contacts this person if the reviewer has a question: a first and last name, a phone number with the country code, and an email. It is not shown in the App Store. If your app has sign-in, frascati sets up an address that Apple's reviewer signs in with, using a fixed code, and puts it into the note for the reviewer.
Save in frascati keeps your texts for later. Save to App Store Connect writes them to Apple.
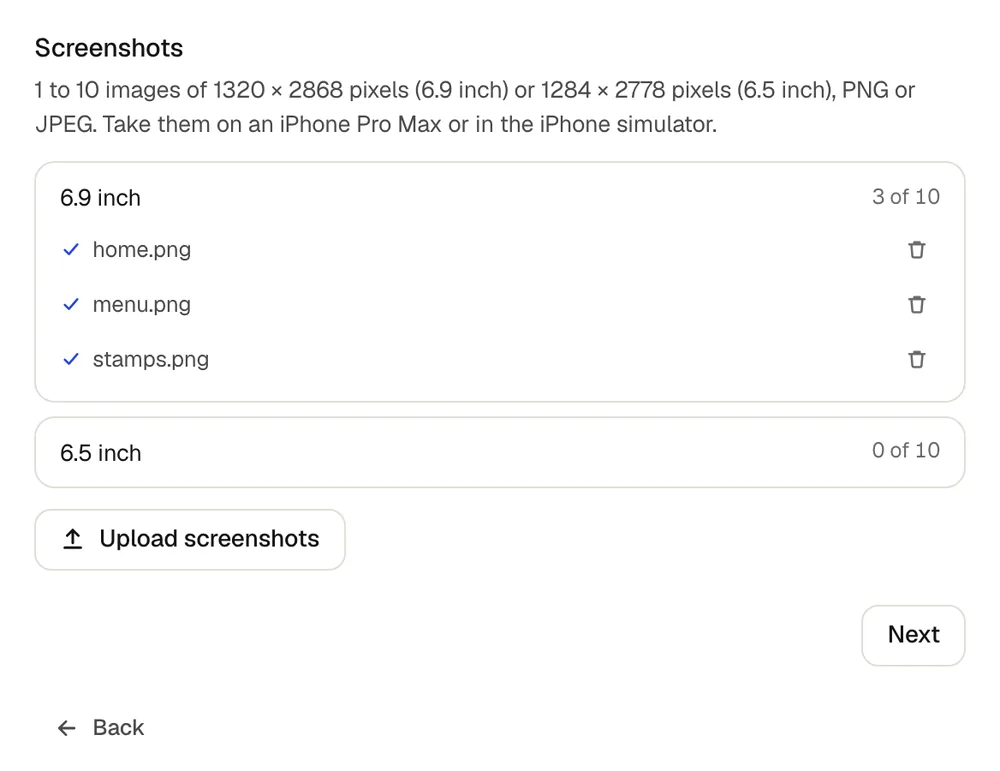
Screenshots
Once the listing is saved, upload 1 to 10 screenshots of 1320 × 2868 pixels (6.9 inch) or 1284 × 2778 pixels (6.5 inch), as PNG or JPEG. Take them on an iPhone Pro Max or in the iPhone simulator; screenshots from other iPhones have other sizes. frascati removes transparency and shrinks large files by itself.
Step 6: App Privacy
Apple asks which data your app collects, and only you can answer, in App Store Connect. frascati read your app and lists exactly what to tick.
In App Store Connect, open your app and choose App Privacy in the sidebar.
Under Privacy Policy, enter the address frascati shows.
Under Data Collection, click Get Started and answer the first question as frascati says: whether your app collects data.
If it does, tick the data types frascati lists, and for each one answer as listed: what it is used for, whether it is linked to the person, and No for tracking.
Click Publish at the top right.
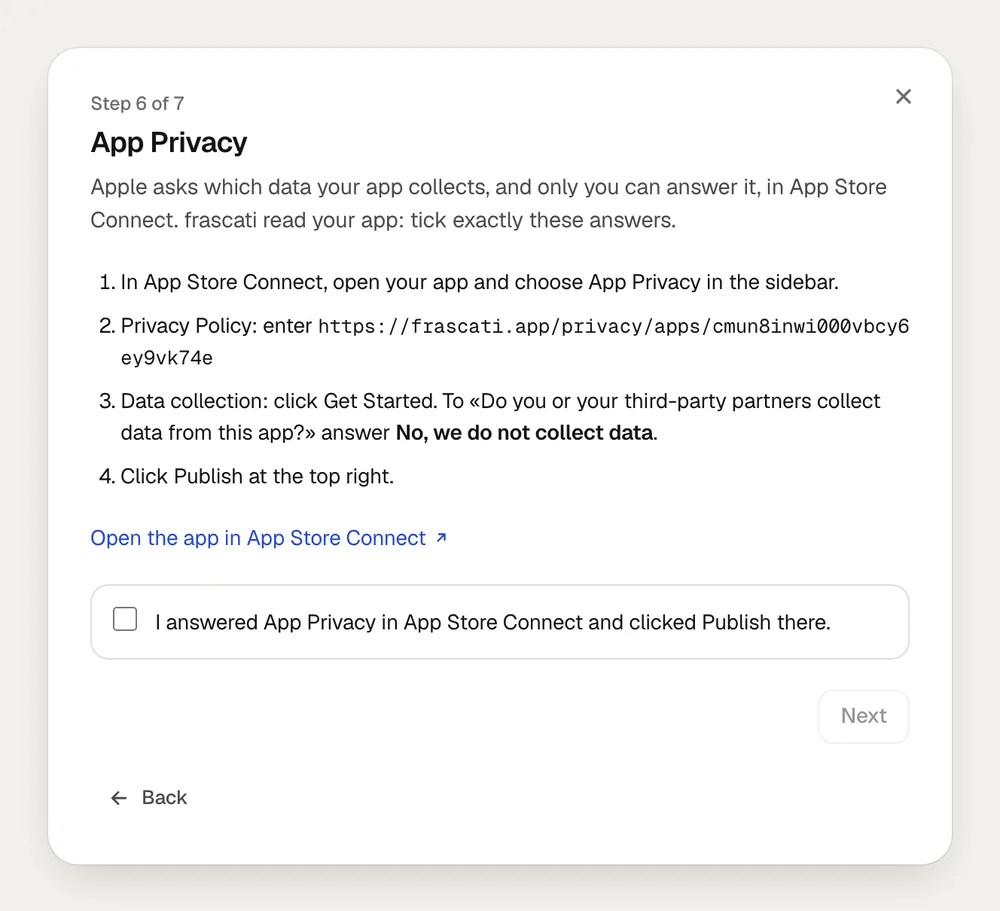
Then tick I answered App Privacy in App Store Connect and clicked Publish there in frascati. For example, an app with customer accounts collects the email address and the name, linked to the person. frascati apps never track people.
Step 7: Check and submit
Apple rejects apps with placeholders, missing texts or a privacy policy that does not open. Before you submit, frascati checks:
- No placeholders in the app
- App name of 30 characters at most
- Store listing complete and saved at Apple
- Privacy policy online
- Screenshots uploaded
- Build ready in TestFlight
Two boxes are yours to tick: App Privacy answered in App Store Connect and I tested the app on my iPhone with TestFlight.
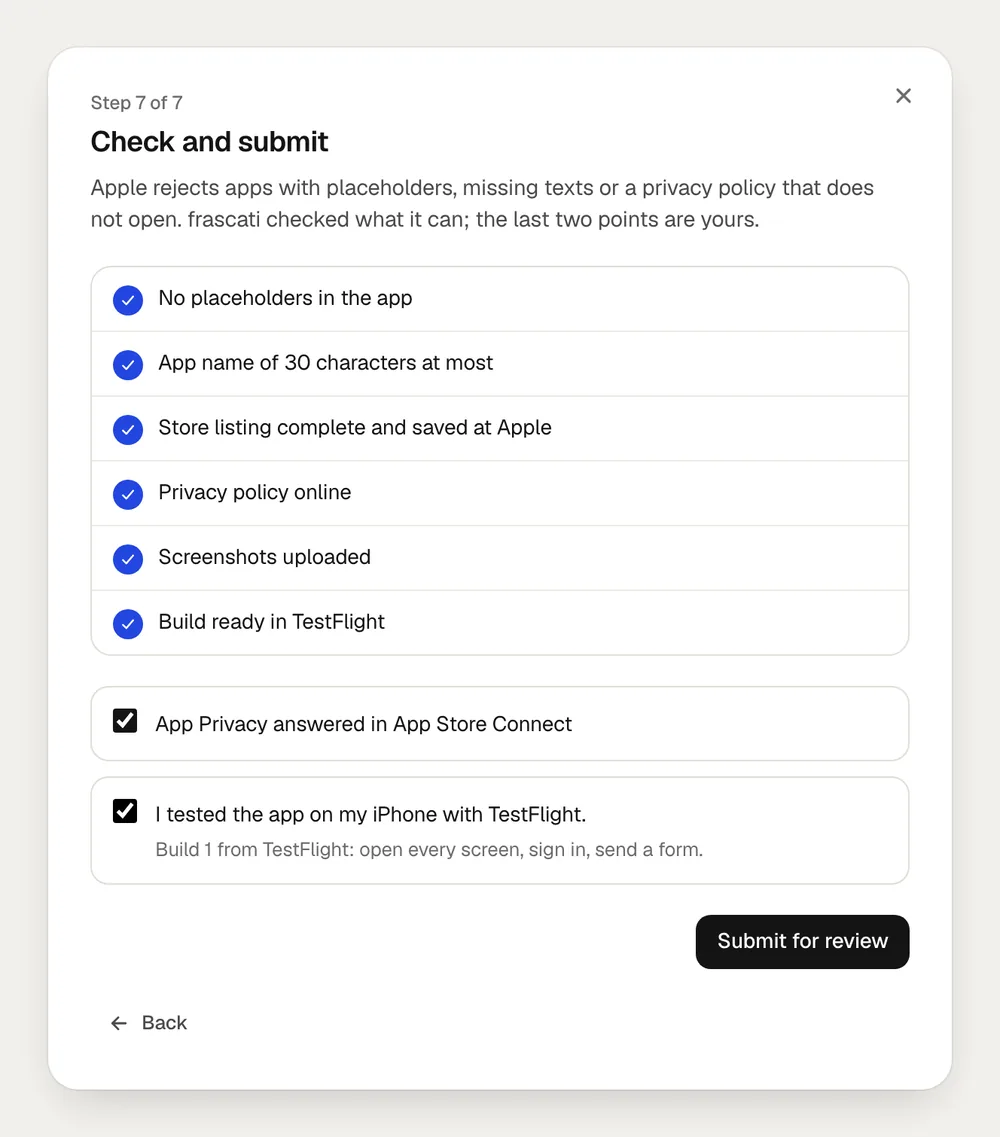
Anything missing has a button next to it: Fix takes you to the right step, and Let the AI fix it removes placeholders. When everything is ticked, click Submit for review and confirm. The app goes to Apple under your developer account. Once Apple approves it, it goes live automatically, unless you changed that in App Store Connect.
Apple's review
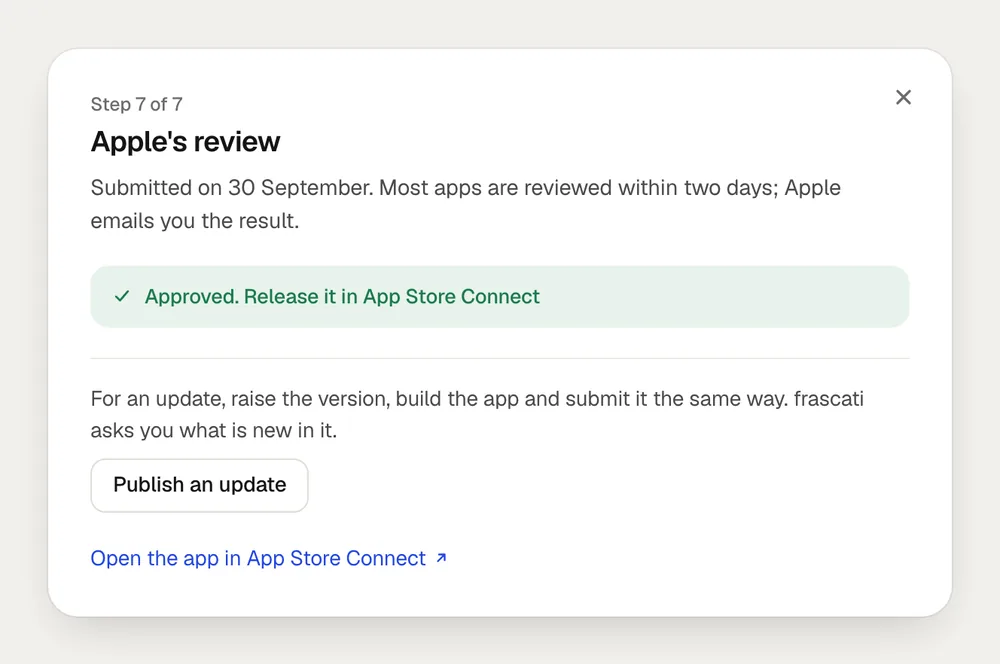
Most apps are reviewed within two days, and Apple emails you the result. The Publish window shows where your app stands, from submitted to live:
- Waiting for Apple's review
- Apple is reviewing the app
- Approved. Release it in App Store Connect
- Approved. Apple is releasing it
- Live in the App Store
- Apple rejected the app
If you chose in App Store Connect to release the app yourself, the Publish window says Approved. Release it in App Store Connect once Apple approves it. In App Store Connect, open your app, choose the version with the status Pending Developer Release in the sidebar and click Release This Version at the top right. It can take up to 24 hours until the app appears in the App Store.
If Apple rejects the app
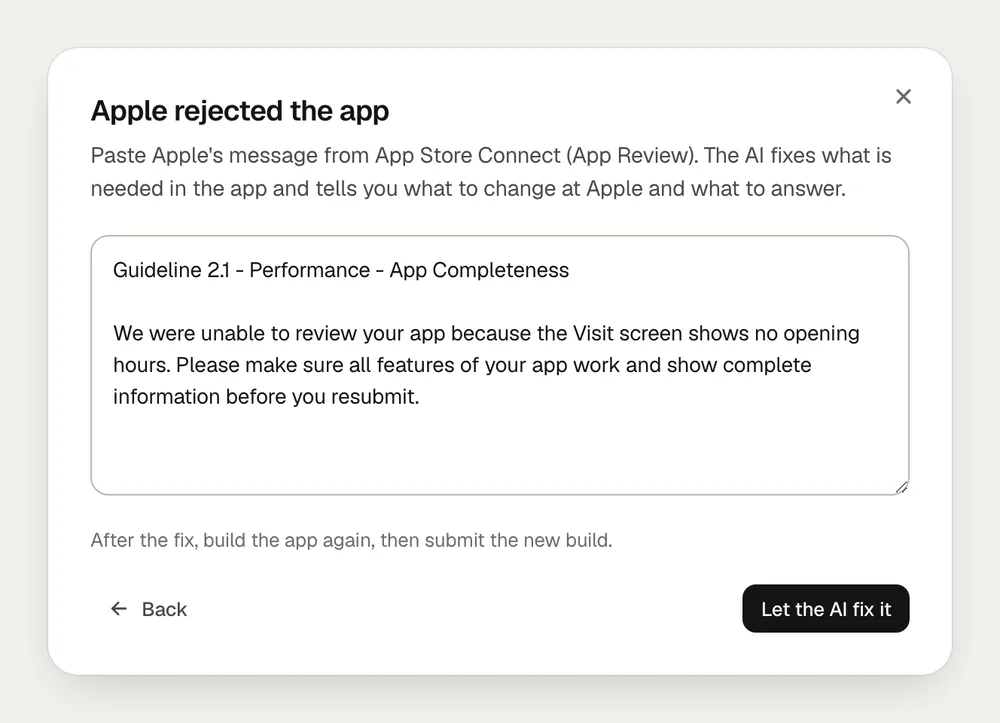
In App Store Connect, open App Review and copy Apple's message.
In frascati, open Publish and click Send in Apple's message. Paste it and click Let the AI fix it.
The AI fixes in the app what Apple asks for and changes nothing else. If part of it is in App Store Connect, like screenshots or the note for the reviewer, it tells you step by step what to do there, and writes a short, polite reply you can paste into App Review.
Build the app again, then click Check and submit again. The store listing stays as it is unless you change it.
Publish an update
Once Apple approved the app, Publish an update takes you back to step 2. Raise the version, for example from 1.0.0 to 1.1.0, build the app and submit it the same way. frascati asks what is new in this version, and the App Store shows it with the update.
Google Play
frascati publishes to the App Store for you. For Google Play, you download the app project and publish it with Expo's tools under your own Google Play developer account, which Google charges US$25 for, once. New personal accounts first run a closed test with at least 12 testers for 14 days. Every step: Publish your app on Google Play.
Something missing or unclear? Write to us.